.png)
Getting a domain directly from Shopify may cost you more than getting it from a third-party site such as GoDaddy, HostGator, NameCheap, BlueHost, Hostinger, and many more. This is one of the main reasons why a lot of e-commerce sellers get domains from a third-party site and not from Shopify. Aside from the domain purchase, you also need to consider the renewal price.
If you also hold a lot of stores, it may be beneficial for you to get it from those third-party domain registrars. When you connect a third-party domain to Shopify, it points your domain name to your Shopify store. So when someone enters your URL into their browser, they’ll be directed to your Shopify e-commerce shop.
In this tutorial, we will walk you through the general setup on how to connect your domain to your Shopify. It doesn’t matter what third-party site is, the process will be the same. Interested in e-commerce strategy services? Contact our team at Bluetuskr, an e-commerce marketing agency.
Connect your Domain to Shopify
To start off, access your Shopify Admin at http://www.shopify.com.
Connect to Shopify
On your Shopify Admin, click the Online Store tab on the left side then select Domain on the drop-down.
You should see your primary domain in there which should be the MyShopify domain. What we need to do next is to connect a domain from a third-party site.
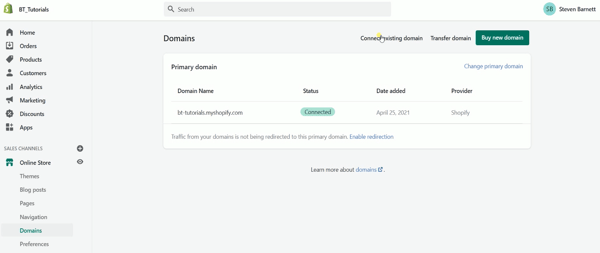
Click the Connect Existing Domain located on top then type the domain that you have on the field and click Next.
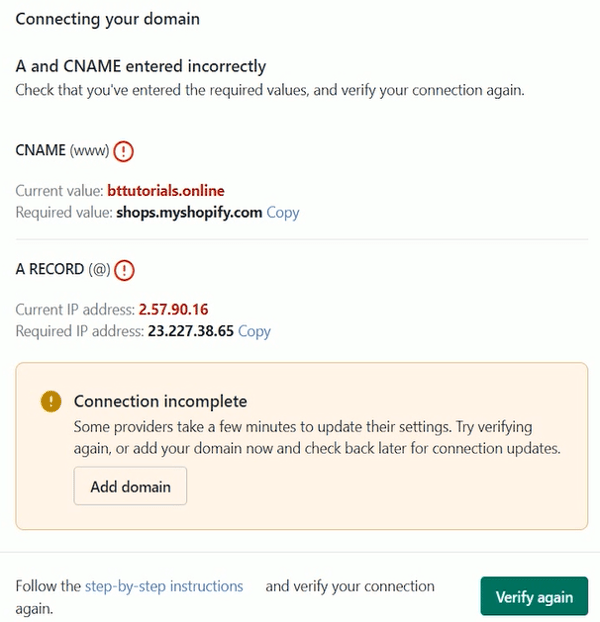
In order for us to know the values that we need to change, let’s click the Verify.
It now will show us what values need to be changed. So we will need to change 2 values which are the CNAME and the A RECORD.
The next thing that you need to do is to access the third-party site on where you bought your domain. For this tutorial, our domain is bought from Hostinger so I’ll log in to HosTinger.com.
Change DNS Values
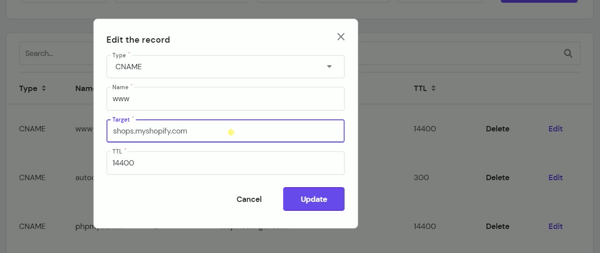
Access the Domain Name System Records or DNS Records. On Hostinger, you can access them on the DNS / Nameserver tab.
This is where you should see the list of records. We will be changing the CNAME and the A RECORD.
Go back to your Shopify window and notice that the current value on CNAME is bttutorials.online and it needs to be changed to shops.myshopify.com. So just click Copy on the required value of the CNAME and go back to your domain registrar.
Look for the CNAME that has the same value indicated in Shopify and edit it. Replace it with the one that’s indicated on Shopify which is shops.myshopify.com and update the changes.
Go back to your Shopify window and the next value that we need to change is the A RECORD. Copy the required IP Address and take note of the current IP address. Go back to your domain registrar window and look for the A RECORD indicated on Shopify.
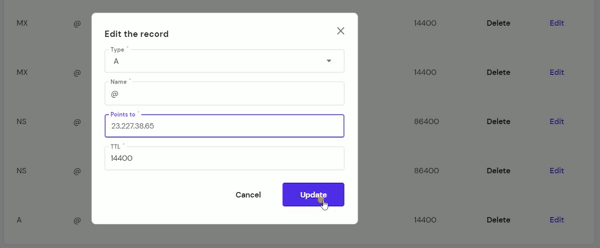
Replace it with the required IP address and update your changes.
Verify Your Connection
Go back to your Shopify window and click the Verify Again button. It should then show you that the primary domain has been updated to your personalized domain.

You now have updated your domain and when your customers enter your URL, all of them will be directed to your Shopify store.
Connect your Domain to Shopify Summary
1. Login to Shopify and to your Domain Registrar
2. Connect to Existing Domain
3. Change DNS Values (CPANEL & A RECORD)
4. Verify Connetion

Watch The Tutorial Here:
Connect With Us
Recent Post

- Oct 28, 2023
- Author: Andrew Maff
Tips and Best Practices in Designing the Shopify Homepage

- Sep 12, 2023
- Author: Andrew Maff
How to Use Shopify AR & 3D Models to Boost Customer Engagement

- May 15, 2023
- Author: Andrew Maff
How to Start a Free Shipping Promotion on Shopify - Updated 2023


Tell us what you think!