.png)
"Can I just utilize my Facebook messenger communication on my store?" is a typical query that we normally receive and the answer is YES, you certainly can, and it is completely free. It is possible to set up a Facebook Messenger within the Shopify backend, which is beneficial for your customers and your store.
Having a Facebook Messenger Chatbot on your Shopify website works because it sends the correct message to customers at the right time, regardless of where they are in the buying process. Brands that do not include Messenger marketing in their digital marketing strategy will be left behind. The platform's immediate nature makes it a great tool for marketers to interact with their target audiences and deliver tailored messaging. The possibilities are unlimited as people flock to the instant chatting platform.
In this tutorial, we will walk you through setting this up as well as an overview on how you can personalize your customer experience.
Setup Facebook Messenger Chatbot to Your Shopify Website
In this tutorial, we will walk you through setting this up as well as an overview on how you can personalize your customer experience.
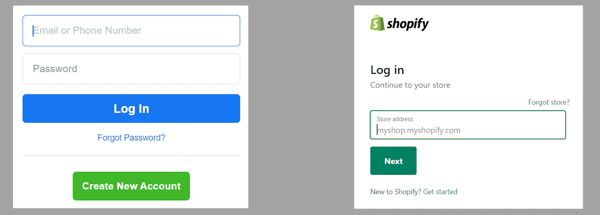
You can start by logging in to your personal Facebook account at Facebook.com and to your Shopify Admin at Shopify.com.
Access the Messaging Settings
Once you're in your Facebook personal account, access the page for your Shopify Website. Once you're on your page, go to your Page Settings. Scroll down to the bottom of the Manage Page section and select settings. then click the Messaging Option on the page settings.
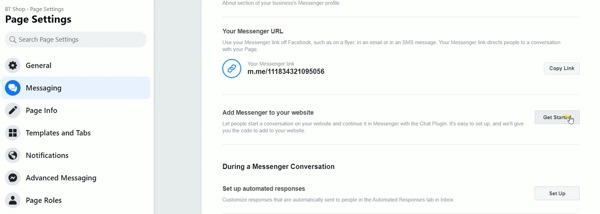
Add Messenger to your Website
On the Messaging Settings, scroll down to the Add Messenger to your Website section and click the Get Started Button.
You should then be taken to the Chat Plugin tab of your Facebook Business Suite inbox.
We still didn't have any website added to our page so we'll be setting this up. Click the Set Up button.
Step one is to set the language. Just set your desired language and click Save & Continue.
Next is to add a Domain. Just fill in the field with your Shopify Store domain and click Save and Continue.
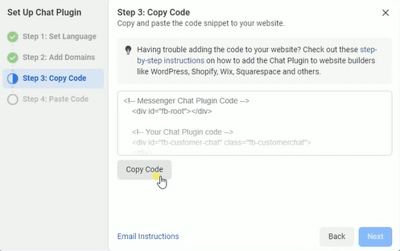
The next two steps are to copy and install the code in your Shopify. Click the Copy Code button and go to your Shopify Admin.
Click the Online Store sales channel. Under themes, click the Actions drop-down and select Edit Code.
Under the Layout list, select THEME.LIQUID.
What we need to look for is the Opening Body Tag. It is usually located after the closing head tag. Just right below the opening body tag, paste the code that you have copied earlier.
So this is the full Messenger Chat Plugin Code.
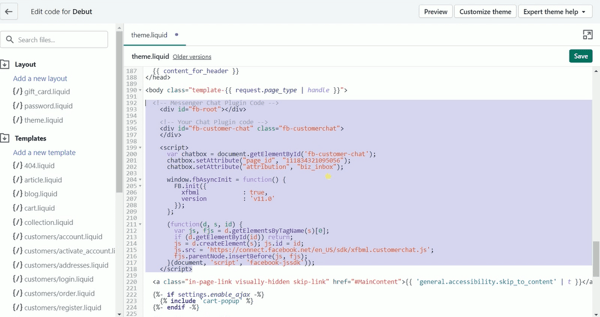
Save the changes that you made.
You now have added a Facebook Messenger Chatbot on Your Shopify Website. You can verify the installation by going to your website and you should see a Messenger icon located at the bottom right.
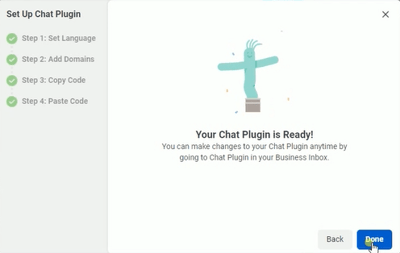
Go back to your Facebook Business Suite and just complete the wizard.
Set Up your Automated Responses
Now that the setup is complete. You can now customize your responses when someone sends you a message.
You can access this setup on your Messaging section in your Page Settings. Click the Set Up button on the Set Up Automated Responses section.
Right now, it's showing that you're available. On the left side are the automated responses that you can set up. There is this Instant Reply on which is the first response that your page will send if someone will send their first message to your page. You can also set up the Away Message. This is the automated response that you can send if you're away, your store is closed, or if you don't have any access to your messenger.
You can also personalize your responses if your customer is getting information, sending confirmations, and giving a follow-up.
Amongst all of those instant replies, what needs to be set up is the Instant Reply and the Away Message. This is where you can set the expectation of your potential customers. The others are optional for your business.
-Instant Reply
Let's start with the Instant Reply. In order to turn this on, we need to set up your reply first. This is automatically sent instantly after someone sends their first message to your page.
Click the Edit Message button to start customizing.
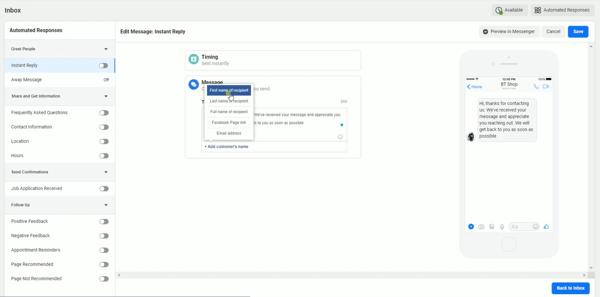
Edit your text. You can also add a dynamic name to add more personalization. Click the Add Customer Name link just at the bottom of the text editor and select the type of name you would want to add to your message. You should see the changes that you made in the preview section on the right.
Once you're done editing your message, Save your changes by clicking the Save button located at the upper right.
You should see that the Instant Reply is now turned on.
-Away Message
Next is your Away Message. Click the Edit button to get started.
The first is to set the timing. Indicate the time frame when you're away or the duration of your closing time. Select the days as well. Edit the message that you will be sending and you can then save your changes.
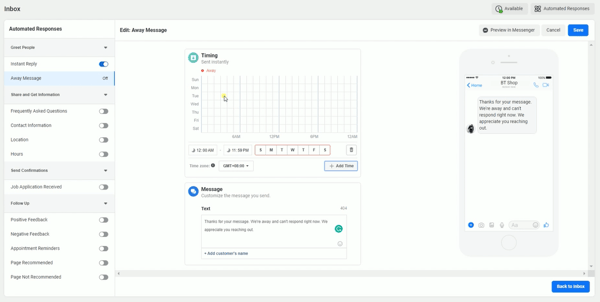
As you can see that the Away Message is currently turned off. This is because we are still showing that we are available. If you set this to Away, then your Away Message will be turned on.
It's better if you set up all of your automated responses. The process should be the same.
Now that you're already set up, you should be able to give anyone a positive experience in contacting you. The possibilities are unlimited as people flock to the instant messaging platform.
BlueTuskr is ready to assist you with integrating your Shopify store with Facebook Messenger. We can help you put up high-quality Messenger flows to help you expand your contact list, lower cart abandonment rates, and reach out to consumers with the appropriate message at the right time. Contact out team at Bluetuskr, an e-commerce marketing agency, we can assist you in expanding your brand.
Setup Facebook Messenger Chatbot to Your Shopify Website Summary
1. Log in to both Facebook and Shopify
2. Access the Messaging Settings
3. Add Messenger to your Website
4. Verify Setup on Website
5. Set up your Automated Response

Watch the video tutorial here:
Connect With Us
Recent Post
- Oct 28, 2023
- Author: Andrew Maff
Tips and Best Practices in Designing the Shopify Homepage

- Sep 12, 2023
- Author: Andrew Maff
How to Use Shopify AR & 3D Models to Boost Customer Engagement
- May 15, 2023
- Author: Andrew Maff
How to Start a Free Shipping Promotion on Shopify - Updated 2023


Tell us what you think!