.png)
We would want to make sure that our ads reach the right customers. By having a Facebook tracking pixel installed on your website, it will provide you important information of your audiences thus help you ensure that your ads are seen by the right people. In this way we can make sure that our money is well spent.
Facebook Pixel will help you with your advertising efforts such as Retargeting, Conversion Tracking, Figuring your Custom Audiences and Lookalike Audiences and Conversion Optimizing. It will also provide you with analytics that allows you to measure the effectiveness of your ads by understanding the what your visitors do on your website.
In this tutorial, we will walk you through in setting your Facebook Pixel on your Shopify Website.
Setup Your Facebook Pixel
If you haven’t connected yet your Shopify Store to your Facebook page yet, you should do it first and we have it available in our other tutorial.
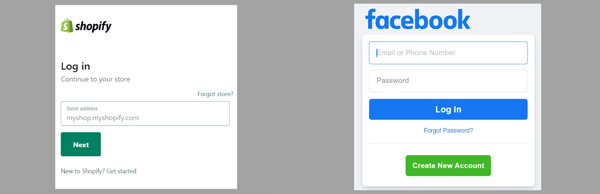
Login to Shopify and Facebook
You can start by logging in to your Shopify at shopify.com and Facebook at facebook.com.
Access your Facebook Business Manager at business.facebook.com. Once you’re logged in to your Facebook account, you should have access to your Business Manager.
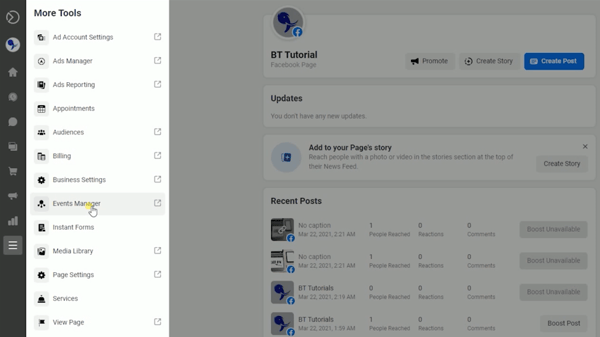
Access the Events Manager
On your Facebook business manager, click More Tools located on the left side of the page and select Events Manager. It should open a new window.
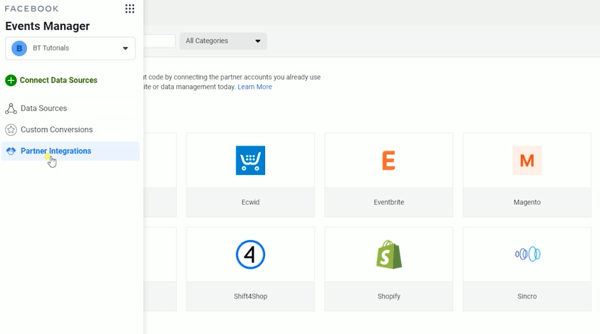
Create a New Pixel
If you have previously connected your Facebook Account to Shopify, the pixel would automatically show up on the list, but for the sake of this tutorial and if incase it did not show up, we will create a new pixel.
Hover your mouse to the left side of the page and select Partner Integration. Click Shopify on the e-commerce list.
Then click the Connect Account button. Select Pixel on the pop-up and click Next. Since this is going to be a new pixel, click the Create a new one link. Enter the Pixel Name and paste your website’s URL then click Continue then click Next.
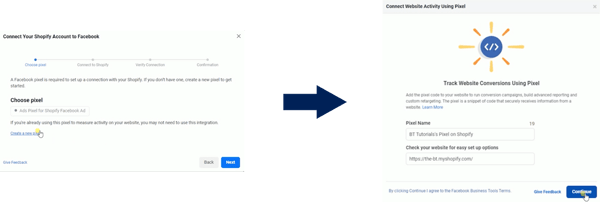
Connect your Shopify account to Facebook. Please check our previous tutorial for that. I’ll post a link in the description.

Turn on Data Sharing Settings
To make sure that your Facebook Pixel will work correctly, we need to make sure that the data sharing is enabled on your Shopify. Access your Shopify Admin and go to Facebook sales channel. Click the Data Sharing Settings and enable it. Set it to the Maximum setting and choose the pixel that you wish to connect.

Verify Facebook Pixel Works
Go back to your Facebook Business Manager and let’s verify the connection. Just enter your store URL on the field and click Send Traffic. It will take you to your store’s page. Once successful, it will show an active status. Just click Next.
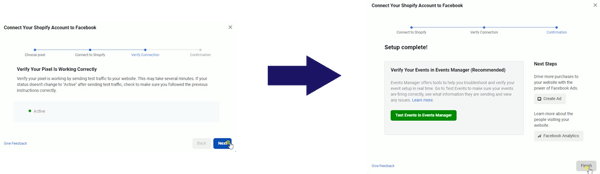
The next should be the confirmation. Just click Finish to complete the setup.
You now have completed your Facebook Pixel setup on your Shopify Website.
With this setup, you can now ensure that your ads can be successful for delivering this to your relevant customers. This should allow you to monitor your Facebook conversions from ads, optimize your ads, build audience for your future ads, and retarget people who have previously interacted with your website.
So this is how you setup your Facebook Pixel to your Shopify website.
Whatever you need, we’re here to help. At BlueTuskr, we’re experts when it comes to Shopify Plus, e-commerce, branding design, content marketing, and more. We also offer many services to help you run your Shopify Plus store.
To learn more about how we can help you, contact us now. Interested in e-commerce social media service? Contact our team at Bluetuskr, ane-commerce marketing agency.
Setup Your Facebook Pixel on Shopify Summary
1. Login to Shopify and Facebook
2. Access the Events Manager
3. Create a New Pixel
4. Turn on Data Sharing Settings
5. Verify Facebook Pixel Works

Watch the video tutorial here:

Connect With Us
Recent Post
- Oct 28, 2023
- Author: Andrew Maff
Tips and Best Practices in Designing the Shopify Homepage

- Sep 12, 2023
- Author: Andrew Maff
How to Use Shopify AR & 3D Models to Boost Customer Engagement
- May 15, 2023
- Author: Andrew Maff
How to Start a Free Shipping Promotion on Shopify - Updated 2023


Tell us what you think!