
.png)
Any company's digital marketing strategy should include social media. It's an important tool for sharing material, building links, and increasing interaction. You may reach out to even more people with social ads, generally at a minimal cost. You can then convert these users into followers and market to them in the future.
By far the most popular social media marketing platform is Facebook. You can spend as much money as you want on Facebook advertising. You establish a budget from the beginning, and after you reach that amount, Facebook will cease showing your ad. According to an eMarketer poll, 96 percent of social media marketers believe Facebook is the top social media channel for ROI.
There are numerous advantages for you to begin advertising on Facebook. We'll walk you through the basics of establishing a Facebook ad for your Shopify products in this article.
Create a Facebook Ad for Your Shopify Products
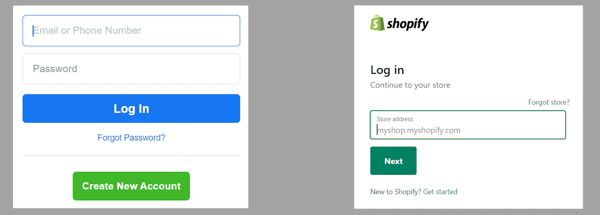
Login to Both Facebook and Shopify
Log in to Facebook.com and Shopify.com to get started. Make sure that you're on the correct account.
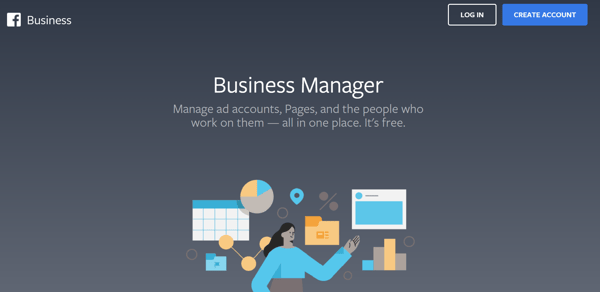
Create a Facebook Business Manager
The first thing that you need to do is to create a Facebook Business Manager for your Facebook Account. Go to business.facebook.com and create a business manager account using your personal Facebook account. Just go through the creation wizard.
Connect your Shopify to your Facebook
We have a previous tutorial on how to connect your Shopify to your Facebook. In this way, your products will be synced and you will also be able to create an Advertising account, create a Facebook Pixel and automatically install it to your Shopify website.
The setup is pretty easy and convenient.
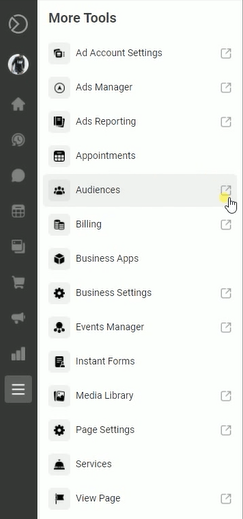
Create Facebook Audiences
What we need to do next is to create a Facebook Audience. Setting up your Facebook Audience allows you to target your ads to the individuals you care about. The method you use is determined by the goal you're attempting to achieve and the resources you have.
On your Business Manager, click the More Tools Icon and click Audiences.
So there are 4 ways of creating an Audience on Facebook.
People that have expressed an interest in your company or product are known as Custom Audiences. This is where you may build an audience based on your client database, internet traffic, or mobile app usage.
Lookalike Audiences are individuals who are similar to the people you already care about. Lookalike audiences may be created using individuals who liked your page, conversion pixels, or any of your current custom audiences.
The Saved Audiences option is where you look for new audiences from scratch. You can search for audiences based on their demographics, interest, and behaviors and you can save them to reuse in future ads.
The last one is the Special Ad Audience. You can reach people who have similar online behavior as your most valuable customers. Mostly this is used for political ad campaigns.
Custom Audience and Lookalike Audience
As you can see, we already have an audience created. To create a new one, click the Create Audience button and we'll create a Custom Audience. On the source, select which source these audiences came from.

For this example, we will be selecting the website option. These are individuals who have already visited your website or your previous customers.
You can select the event that they have performed on your website. Retention is the number of days you want people to remain in your audience after meeting the website traffic criteria you specified. People will be removed from your audience after this time unless they meet the criteria again.
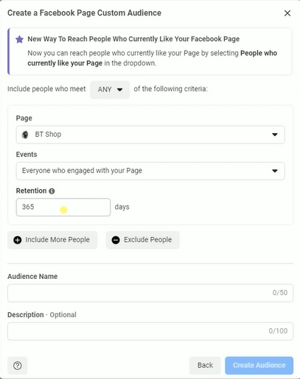
You can add as many events as you want. Just name this audience and click Create Audience.
After creating it, you will be able to create a lookalike audience based on the previous one that was created. Just make sure that you select the correct audience on where you would want to create a lookalike and set the Audience size.
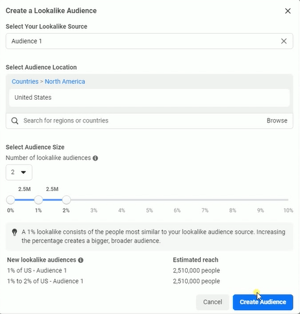
You should see the estimated reach based on the size that you have selected. Just click the Create Audience button to create a lookalike audience based on your selection.
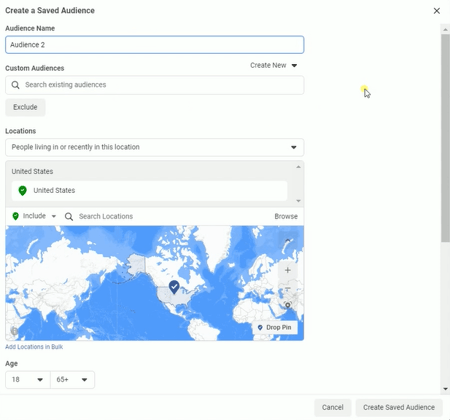
Saved Audience
Select the Saved Audiences option to create one. You can use your previously created audiences and filter them more to narrow down the reach. Set the location on where you would want your ad to be displayed.
Next is detailed targeting. You can look for people who match your interest in the product that you're selling. For example, if you're selling computers, you may want to filter your audiences that are graphic designers, gamers, or just merely casual users. If you place them under your audience who have previously interacted with your website, then you can narrow down the reach and show the right ad for them.
You can also filter your audiences that are related to your niche. You can create as many audiences as you like and compare them both until you will be able to know which of them has the higher profit.
Set their interest, let's say, you are looking for scuba divers, you can narrow them down by adding additional interest and filter them by adding additional criteria. For this example, I'll add diving instructors.
You should see the reach at the lower part. Just click the Create Audience button to create it.
So this is the list of the audiences that you have created including the lookalikes.
Create Facebook Ads
Now that we have created your audiences, we can now create a Facebook Ad campaign.
Click the More Tools on the left side and select Ads Manager.
Now there are 3 levels. First is the Ad Campaign, this is where you set the intention of the ad and the budget for the entire campaign. In an Ad Campaign, you can create a couple of ad sets. This is for your different types of audiences and this is also where you can set the budget for the Audience that you have selected. If you are testing your audiences, you can create many types of ad sets for them. Then under an ad set is the ads. This is where you will be designing the ad visuals and how you want them to appear to your audiences.
Ad Campaign
Click the Create button to start.
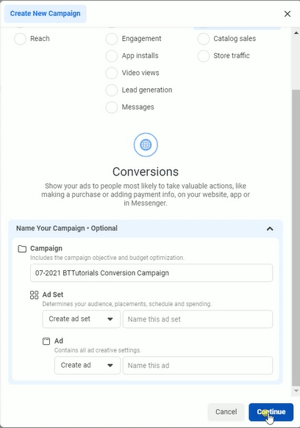
Select the objective for your campaign and name your campaign. Since we want our audience to convert, then we will select conversion. It is a best practice to place the date on when you want to run these ads and then the associated page then the objective. Just click the Continue button for the next step.
Now we will be setting up the Campaign. Scroll down to the bottom and turn on the Campaign Budget Optimization. This is the total budget for this Ad Campaign and this will be distributed across the Ad sets associated with this campaign
Ad Set
Next would be the Ad Set. It's a best practice if you name your ad set in this format. First will be the date, then the audience you want to target, and the goal.
For the Conversion, select Website since we are directing people to check out your website.
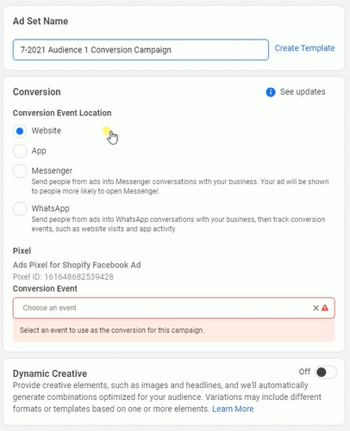
For the Conversion Event, it's advisable to use Add to Cart if you have less than 50 purchases or if you're just starting up and Purchase if you have more than 50.
Set the Budget and Schedule. Choose a date on when you would want to run the duration of the ads.
Click the Show More Options link. Now if you have multiple ad sets, this is where you will set the limits for the Ad Spend. Just make sure that you don't exceed the amount that you set on your Campaign on all of your ad sets.
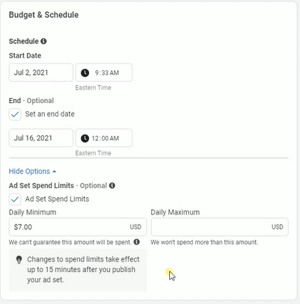
Now if you are doing a test for different audiences, then you can just set it lesser than the main ad set. But for this example, we will just remove the ad spend limits.
We will be choosing the audiences on where we would want to show our ads. Now since this for Audience 1, we will be choosing Audience 1 on the custom audiences. Set the location for your ads and set the demographics. Unless you are selling a specific item that requires you to change gender and age, then just set it up.
For placement, you can set it to automatic. But if you want to set it manually, you can just check the manual placement option and choose the platform or the placement on where you want to show or your ads.
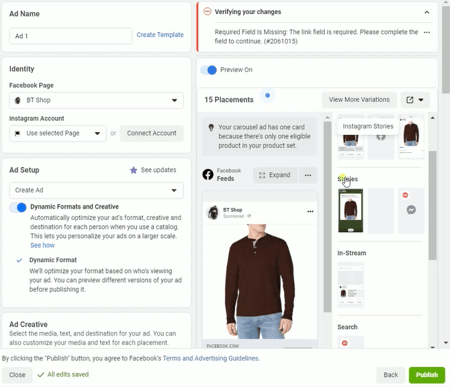
Once you're set with this setup, just click Next to proceed with the Ad. You can create multiple ads for each ad set. So the first thing is to name this ad. Next is to choose the Facebook Page that owns the ad. You can also connect an Instagram account and just make sure that you select it.
Ad
For the Ad Setup, turn on the dynamic formats and creative.
On Ad Creative, make sure that you select the correct catalog and choose the correct product set for this ad. For your cover media, we will do a single image ad and choose the media that you wanted to be displayed and click Continue.
Place your primary text and the description. You should see your text placement in the preview area on the right.
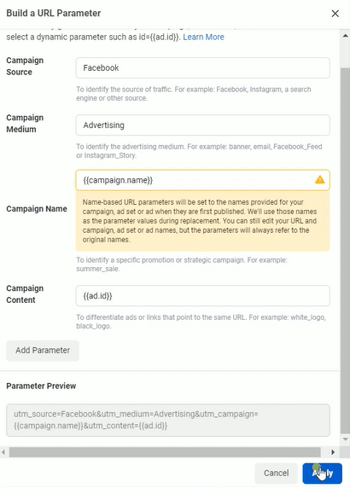
Next would be the call to action. For this ad, we will set it to Shop Now. Place the website URL on where you want to direct your customers once they click the call-to-action button. Click the Preview URL button to make sure that it opens the correct page of your website.
You can just scroll down and let's set or build a URL parameter. The campaign Source will be Facebook and for our Campaign Medium, just set it to advertising. For your campaign name, just choose the dynamic campaign name. Lastly, would be the campaign content. Just choose the dynamic Ad ID on the option.
You can click the more variation and you should see how your ads are placed.
Review your Ad setup and once everything is all set, just click the Publish button at the bottom right.
You should see the confirmation at the bottom-right of the page on how many ad campaigns, ad set, and the ad was published.
You should see the items that you have created on the list. You can create multiple ad sets on one campaign, and multiple ads for an ad set. Just click the Create button on the appropriate tab.
Create a Facebook Ads Campaign on Shopify
Since you already have set up your Facebook ads, you can now set up Facebook Marketing on Shopify. In this way, you can set up your ads directly from Shopify.
Setup Facebook Marketing
On your Shopify Admin, click the Facebook sales channel on the left and click Continue Setup.
Because we've already linked our Facebook account to Shopify, those first two items should be checked and we will just continue the setup.
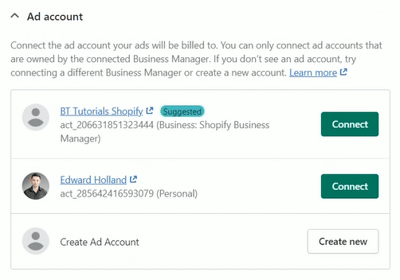
Click the Connect button to the correct Ad account.
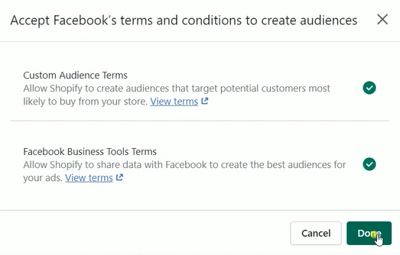
Next is to Accept Facebook's Audience and Tools terms. Just click the View and Accept Terms button to the first one and on the next window, click Agree located at the upper right of the page. Do the same process for the second one. Once you have accepted the terms, it should have a green check beside it. Once you have 2 of those green checks, the Done button will show up, and just click it.
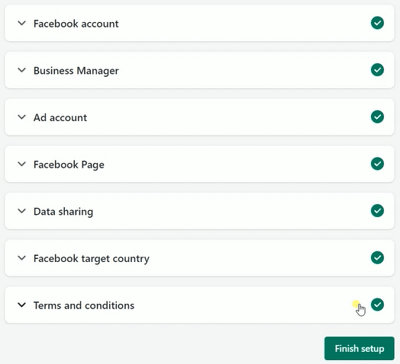
Data Sharing and the Facebook Page setup is automatically completed since we already have connected our Facebook and Shopify.
Select the Facebook target country or region and Accept the terms and conditions.
Once you have all of the green checks for all items, you can now click the Finish Setup button.
It should now give you a prompt that your Facebook Marketing is all set.
Create a Facebook Ad on Shopify
Now that you already have your Facebook Marketing setup, you can now create Facebook ads directly from Shopify.
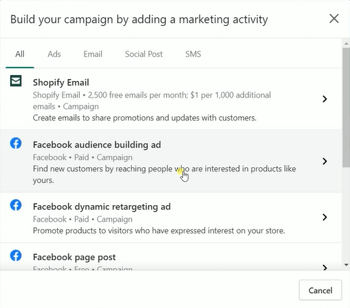
You can create a campaign directly from the Facebook Sales channel or you can also click the Marketing Tab on the left side. Then click the Create Campaign to start creating one.
For this example, we will select a Facebook audience-building ad.
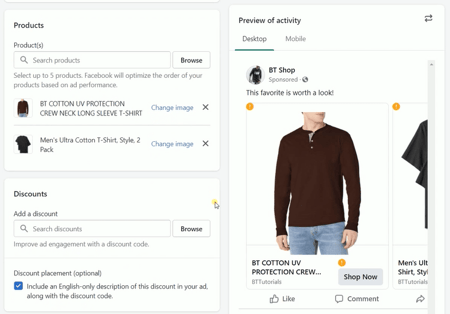
Enter the activity name then select the products that you want to advertise on Facebook. You can select up to 5 products in your store.
If you have discounts set up in our store, then you can add them to the discount section.
Add your ad text. You should see the placement of the text on the preview section located on the right
Specific interest is when you want to target people who have interests related to what you are selling. For example, you're selling scuba gears, then you will look for individuals who are also interested in scuba diving. We'll be selecting Men's Clothing and Men's Fashion since what we have here is a long sleeve.
Unless you're selling a gender-specific or age-specific item, then feel free to change the demographics.
Set your budget for this campaign. You can set it on a daily spend or a lifetime budget.
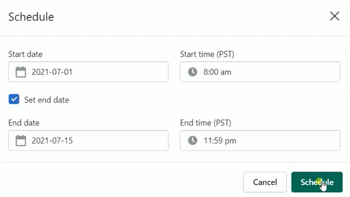
Review your campaign and once you're all set, click the Schedule button at the bottom right.
Set the duration of your campaign and click Schedule.
You should then see a confirmation that the campaign was created. The last thing that you can do is to rename your campaign.
This will go through a review process from Facebook and it may take 24-48 hrs for this to be approved.
You should see your campaign listed and after the approval, the numbers should start showing up.
This is a pretty long process and if you encounter complications along the way, you can always let us know and we at BlueTuskr an e-commerce marketing agency, are here to help.
Create a Facebook Ad for Your Shopify Products
1. Login to Both Facebook & Shopify
2. Create a Facebook Business Manager account
3. Connect Your Shopify to Facebook
4 Create Facebook Audiences
5. Create Facebook Ad
6. Setup Facebook
7. Setup Facebook Marketing on Shopify
8.Create a Facebook Ad on Shopify

Watch the video tutorial here:
Connect With Us
Recent Post
- Oct 28, 2023
- Author: Andrew Maff
Tips and Best Practices in Designing the Shopify Homepage

- Sep 12, 2023
- Author: Andrew Maff
How to Use Shopify AR & 3D Models to Boost Customer Engagement
- May 15, 2023
- Author: Andrew Maff
How to Start a Free Shipping Promotion on Shopify - Updated 2023


Tell us what you think!