.png)
Google Tag Manager is a stand-alone free tracking tool and management platform that allows its user to add snippets to their website, marketing tags, and collect marketing data. Google Tag Manager has helped a lot of online marketers in making their life easier.
So, Google Tag Manager lets you manage various JavaScript tracking codes which is also known as Tags on your website, and Google Analytics tracking code is one of those tags. Google Analytics on the other hand is a reporting tool that analyzes your website activity. Since Google Tag Manager has no reporting feature, it’s used to send data from your website to other marketing or analytics tool including Google Analytics.
Both work together and we will walk you through how to set this up on your Shopify website since we also now have Google Analytics 4.
Set Up Google Tag Manager on Shopify
Pre-requisites
Before we start, make sure that you are using Google Chrome as your web browser because it will sync all of your accounts and we will also be using a Google Chrome Extension to verify our installation. Make sure that you are also logged in to the correct Google Account.
Access your Shopify admin by going to www.shopify.com. What we need to do next is to set up your Google Tag Manager.
Create a Google Tag Manager Account
You can access Google Tag Manager at tagmanager.google.com. It will automatically log you into your Google account. We are going to set up our first Google Tag Manager account.
Click on the Create Account button or in the white space to start creating your account. Enter your company name, indicate the country, and put a check on the “Share data anonymously with Google and others”.
On the Container Setup, type in your website address on the field and choose the target platform. Since we are just using a website, then we will be selecting Web. Then click the Create button.
Add GTM Snippets to Shopify's Theme.Liquid
You now have your Google Tag Manager snippets. What we just need to do is to add these snippets to your Shopify Website. To view your GTM snippet, you can also click your GTM number located on top.
Now if you’re not into coding, then don’t worry, we are the same. But seriously! We can install these snippets without any knowledge of coding.
The top snippet is for the Head tag and the bottom snippet is for the Body tag. Let’s start with the Head snippet. Click the Copy Icon of the top snippet to copy it.
Go back to your Shopify Admin and on the Sales Chanel, click Online Store. Under themes, click the Actions drop-down and select Edit Code. On the left side look for Theme.Liquid on the list and click it. Now what we’re going to look for is the Head Tag which is just mostly located on top.
Place your cursor after the Head tag and press Enter. Just put a space for your Google Tag Manager and paste the snippet that you have just copied earlier. Go back to your Google Tag Manager and click the Copy icon of the bottom snippet, then go back to your Shopify. Now, what we need to look for is the Body tag. In most cases, it is just right after the closing head tag. So next to this closing head tag is this long opening Body tag. Just right below it, just press enter to put a space and paste the bottom code that you just copied. Then click Save.
At this point, your Google Tag Manager is already installed in all of your pages except. Now, what we need to do is to set up Google Analytics on where the Google Tag Manager sends it’s data that’s collected on your website. Click Preferences and scroll down to the Google Analytics section. As of now, it’s empty and we need to have a Universal Google Analytics 4 number that will link to your account.
Create a Google Analytics 4 Account
Go to analytics.google.com. As you can see, we don’t have any data that’s streaming yet since there is no account linked to this Google Analytics yet. Let’s create a new account and a new property.
Click Admin at the bottom left side of your Google Analytics dashboard. On the Next Page, click Create Account.
On your Account Setup, enter the account name and on the account data sharing settings, make sure that you put a check on the Google Product & Services and all of the other items in there then click Next.
Next is the Property Setup. Enter your Property Name and indicate the time zone and the currency that you’ll be using. Click the Show Advanced Option to expand it and make sure that you enable the switch for Creating a Universal Analytics Property. Enter your website URL without the “https” because it’s already indicated and make sure that you have selected the Create both a Google Analytics 4 and a Universal Analytics Property. Make sure that you also enable the Enhanced Measurement for Google Analytics 4 property. Then click Next
The last one is about your business. Just indicate your industry and the business size. Also, check your intentions in using Google Analytics. Just check all that applies to your business and click the Create button at the bottom.
Agree to all of the Google Analytics Terms of Service Agreement. You now have a Google Analytics account. What we need to do is to install this on your Shopify website.

Install Google Analytics 4 to Shopify
What we need to do next is to install the Global Site Tag to your Shopify website. Under Tagging Instructions, expand the Global Site Tag and it should show you the code that you need to install. Copy it by just clicking the Copy icon on the right. Go back to your Shopify Admin and edit the code of your Shopify Theme. Make sure that you’re on the Theme.Liquid file. Look for the opening Head Tag and just right below it, press enter to put a space then paste the Global Site Tag and click Save.

Now let’s make sure that our Google Analytics is gathering website information. Now let’s close the webstream details and just go to Google Analytics main dashboard. So as you can see, there is no data yet since we haven’t accessed the Shopify Website yet. Now let’s close our website’s window and access the website again. Let’s try to add something to our Cart. You can go back to your Google Analytics and you should see the data streaming. On the right side, you should see the user that’s accessing the website. It should show 1 user in the last 30mins. Since we just accessed it and added something to the cart.
It should continue to stream until you uninstall the code or close your website.
Install Universal Analytics and Google Tag Manager on Shopify Preferences
Now let’s install the Google Tag Manager on the preferences to make sure that it’s going to be sending data to your Google Analytics account.
Go back to Shopify and click Online Store > Preferences. Go to the Google Analytics Section. Now let’s look for the UA number or the Universal Analytics ID. Go back to your Google Analytics and Click Admin on the bottom left. Under the Property column, click Data Streams and select your website on the list and we’re back to the Web Stream details. Scroll down to the Additional Settings and click the Connected Site Tags. Copy the Universal Analytics ID and paste it on the Google Analytics field on your Shopify Online Store Preferences then Save your Changes.
What we need to do next is to add the Google Tag Manager on the custom JavaScript. Just click the Add Custom JavaScript to enable the field. Go back to your Google Tag Manager and access the tag by clicking the GTM ID on top. Copy the top code and paste it on the JavaScript field of Google Analytics then Save your changes.
Publish The GTM Container
The next thing that we need to do is to publish the container so Google Tag Manager will start sending data to your Google Analytics. Go back to your Google Tag Manager and close the snippet window. As you can see that nothing yet is published on the green section of the main dashboard. Click the Submit button located on the top right of the page. Indicate this version name and just click Publish.
You should see that it is now a Live Version on the green section. This means that it is already sending data.
Verify Setup
Now the last thing that we will be doing is just to verify that the Google Tag Manager is really installed and is sending data to the correct Google Analytics account. As I said in the first part of this tutorial, we will be using the Google Chrome extension.
So open a new tab and search for Google Tag Manager Extension. The first link should be the Tag Assistant Legacy (by Google). This is the one made by Google for this integration. So just add this extension to your Chrome Browser. Make sure that you pin the extension to your top panel.

Go back to your Shopify website and click the Tag Assistant Legacy by Google in the pinned extension and enable it. So after it’s enabled, it will start analyzing the pages of the current tab. Just refresh the page and it should give you the results.
As you can see, the first and the second item is on the Global Site Tag and it contained the Measurement ID and the Universal Analytics ID. This is what we installed in the Shopify Theme.Liquid. We also have Universal Analytics on our third item. This is what we did in the Preferences section of your Online Store. It also detected the Google Tag Manager and it has the same ID as what we have.
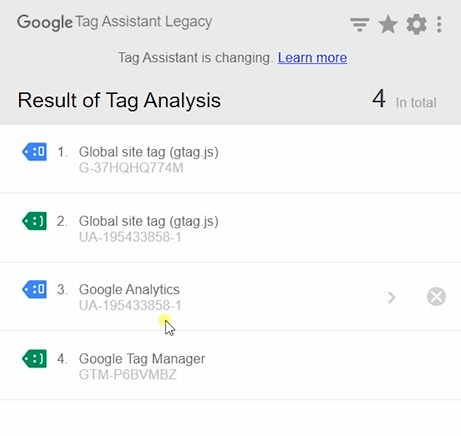
This meant that we successfully installed our Google Tag Manager and we have set up our Google Analytics 4 correctly on our Shopify Website. Once your visitors visit your site, your Google Analytics will keep populating with data of your customer activities.
So that is how you set up Google Tag Manager and Google Analytics 4 on your Shopify website.
Whatever you need, we’re here to help. At BlueTuskr, we’re experts when it comes to Shopify Plus, e-commerce, branding design, content marketing, and more. We also offer many services to help you run your Shopify store. Interested ine-commerce CRO services? Contact our team at Bluetuskr, an e-commerce marketing agency.
To learn more about how we can help you, contact us now.
Set Up Google Tag Manager and Google Analytics 4 on Shopify Summary
1. Login to Shopify and Google
2. Create a Google Tag Manager Account
3. Add GTM Snippets to Shopify's Theme.Liquid
4. Create a Google Analytics 4 Account
5. Install Google Analytics 4 to Shopify
6. Install Universal Analytics and Google Tag Manager on Shopify Preferences
7. Publish The GTM Container
8. Verify Setup

Watch The Tutorial Here:
Connect With Us
Recent Post

- Oct 28, 2023
- Author: Andrew Maff
Tips and Best Practices in Designing the Shopify Homepage


- Sep 12, 2023
- Author: Andrew Maff
How to Use Shopify AR & 3D Models to Boost Customer Engagement

- May 15, 2023
- Author: Andrew Maff
How to Start a Free Shipping Promotion on Shopify - Updated 2023


Tell us what you think!